
Nextcloud is a popular self-hosted solution for file sync and share as well as cloud apps such as document editing, chat and talk, calendar, photo gallery etc. This guide will walk you through setting up Nextcloud AIO using Docker Compose.
This blog post would not be possible without immense help from Sahil Dhiman a.k.a. sahilister
There are various ways in which the installation could be done, in our setup here are the pre-requisites.
- A server with docker-compose installed
- An existing setup of nginx reverse proxy
- A domain name pointing to your server.
Step 1 : The docker-compose file for nextcloud AIO
The original compose.yml file is present in nextcloud AIO's git repo here . By taking a reference of that file, we have own compose.yml here.
services:
  nextcloud-aio-mastercontainer:
    image: nextcloud/all-in-one:latest
    init: true
    restart: always
    container_name: nextcloud-aio-mastercontainer # This line is not allowed to be changed as otherwise AIO will not work correctly
    volumes:
      - nextcloud_aio_mastercontainer:/mnt/docker-aio-config # This line is not allowed to be changed as otherwise the built-in backup solution will not work
      - /var/run/docker.sock:/var/run/docker.sock:ro # May be changed on macOS, Windows or docker rootless. See the applicable documentation. If adjusting, don't forget to also set 'WATCHTOWER_DOCKER_SOCKET_PATH'!
    ports:
      - 8080:8080
    environment: # Is needed when using any of the options below
      # - AIO_DISABLE_BACKUP_SECTION=false # Setting this to true allows to hide the backup section in the AIO interface. See https://github.com/nextcloud/all-in-one#how-to-disable-the-backup-section
      - APACHE_PORT=32323 # Is needed when running behind a web server or reverse proxy (like Apache, Nginx, Cloudflare Tunnel and else). See https://github.com/nextcloud/all-in-one/blob/main/reverse-proxy.md
      - APACHE_IP_BINDING=127.0.0.1 # Should be set when running behind a web server or reverse proxy (like Apache, Nginx, Cloudflare Tunnel and else) that is running on the same host. See https://github.com/nextcloud/all-in-one/blob/main/reverse-proxy.md
      # - BORG_RETENTION_POLICY=--keep-within=7d --keep-weekly=4 --keep-monthly=6 # Allows to adjust borgs retention policy. See https://github.com/nextcloud/all-in-one#how-to-adjust-borgs-retention-policy
      # - COLLABORA_SECCOMP_DISABLED=false # Setting this to true allows to disable Collabora's Seccomp feature. See https://github.com/nextcloud/all-in-one#how-to-disable-collaboras-seccomp-feature
      - NEXTCLOUD_DATADIR=/opt/docker/cloud.raju.dev/nextcloud # Allows to set the host directory for Nextcloud's datadir. ⚠️⚠️⚠️ Warning: do not set or adjust this value after the initial Nextcloud installation is done! See https://github.com/nextcloud/all-in-one#how-to-change-the-default-location-of-nextclouds-datadir
      # - NEXTCLOUD_MOUNT=/mnt/ # Allows the Nextcloud container to access the chosen directory on the host. See https://github.com/nextcloud/all-in-one#how-to-allow-the-nextcloud-container-to-access-directories-on-the-host
      # - NEXTCLOUD_UPLOAD_LIMIT=10G # Can be adjusted if you need more. See https://github.com/nextcloud/all-in-one#how-to-adjust-the-upload-limit-for-nextcloud
      # - NEXTCLOUD_MAX_TIME=3600 # Can be adjusted if you need more. See https://github.com/nextcloud/all-in-one#how-to-adjust-the-max-execution-time-for-nextcloud
      # - NEXTCLOUD_MEMORY_LIMIT=512M # Can be adjusted if you need more. See https://github.com/nextcloud/all-in-one#how-to-adjust-the-php-memory-limit-for-nextcloud
      # - NEXTCLOUD_TRUSTED_CACERTS_DIR=/path/to/my/cacerts # CA certificates in this directory will be trusted by the OS of the nexcloud container (Useful e.g. for LDAPS) See See https://github.com/nextcloud/all-in-one#how-to-trust-user-defined-certification-authorities-ca
      # - NEXTCLOUD_STARTUP_APPS=deck twofactor_totp tasks calendar contacts notes # Allows to modify the Nextcloud apps that are installed on starting AIO the first time. See https://github.com/nextcloud/all-in-one#how-to-change-the-nextcloud-apps-that-are-installed-on-the-first-startup
      # - NEXTCLOUD_ADDITIONAL_APKS=imagemagick # This allows to add additional packages to the Nextcloud container permanently. Default is imagemagick but can be overwritten by modifying this value. See https://github.com/nextcloud/all-in-one#how-to-add-os-packages-permanently-to-the-nextcloud-container
      # - NEXTCLOUD_ADDITIONAL_PHP_EXTENSIONS=imagick # This allows to add additional php extensions to the Nextcloud container permanently. Default is imagick but can be overwritten by modifying this value. See https://github.com/nextcloud/all-in-one#how-to-add-php-extensions-permanently-to-the-nextcloud-container
      # - NEXTCLOUD_ENABLE_DRI_DEVICE=true # This allows to enable the /dev/dri device in the Nextcloud container. ⚠️⚠️⚠️ Warning: this only works if the '/dev/dri' device is present on the host! If it should not exist on your host, don't set this to true as otherwise the Nextcloud container will fail to start! See https://github.com/nextcloud/all-in-one#how-to-enable-hardware-transcoding-for-nextcloud
      # - NEXTCLOUD_KEEP_DISABLED_APPS=false # Setting this to true will keep Nextcloud apps that are disabled in the AIO interface and not uninstall them if they should be installed. See https://github.com/nextcloud/all-in-one#how-to-keep-disabled-apps
      # - TALK_PORT=3478 # This allows to adjust the port that the talk container is using. See https://github.com/nextcloud/all-in-one#how-to-adjust-the-talk-port
      # - WATCHTOWER_DOCKER_SOCKET_PATH=/var/run/docker.sock # Needs to be specified if the docker socket on the host is not located in the default '/var/run/docker.sock'. Otherwise mastercontainer updates will fail. For macos it needs to be '/var/run/docker.sock'
    # networks: # Is needed when you want to create the nextcloud-aio network with ipv6-support using this file, see the network config at the bottom of the file
      # - nextcloud-aio # Is needed when you want to create the nextcloud-aio network with ipv6-support using this file, see the network config at the bottom of the file
      # - SKIP_DOMAIN_VALIDATION=true
    # # Uncomment the following line when using SELinux
    # security_opt: ["label:disable"]

volumes: # If you want to store the data on a different drive, see https://github.com/nextcloud/all-in-one#how-to-store-the-filesinstallation-on-a-separate-drive
  nextcloud_aio_mastercontainer:
    name: nextcloud_aio_mastercontainer # This line is not allowed to be changed as otherwise the built-in backup solution will not work
I have not removed many of the commented options in the compose file, for a possibility of me using them in the future.
If you want a smaller cleaner compose with the extra options, you can refer to
services:
  nextcloud-aio-mastercontainer:
    image: nextcloud/all-in-one:latest
    init: true
    restart: always
    container_name: nextcloud-aio-mastercontainer
    volumes:
      - nextcloud_aio_mastercontainer:/mnt/docker-aio-config
      - /var/run/docker.sock:/var/run/docker.sock:ro
    ports:
      - 8080:8080
    environment:
      - APACHE_PORT=32323
      - APACHE_IP_BINDING=127.0.0.1
      - NEXTCLOUD_DATADIR=/opt/docker/nextcloud

volumes:
  nextcloud_aio_mastercontainer:
    name: nextcloud_aio_mastercontainer
I am using a separate directory to store nextcloud data. As per nextcloud documentation you should be using a separate partition if you want to use this feature, however I did not have that option on my server, so I used a separate directory instead.
Also we use a custom port on which nextcloud listens for operations, we have set it up as 32323 above, but you can use any in the permissible port range. The 8080 port is used the setup the AIO management interface. Both 8080 and the APACHE_PORT do not need to be open on the host machine, as we will be using reverse proxy setup with nginx to direct requests.
once you have your preferred compose.yml file, you can start the containers using
$ docker-compose -f compose.yml up -d
Creating network "clouddev_default" with the default driver
Creating volume "nextcloud_aio_mastercontainer" with default driver
Creating nextcloud-aio-mastercontainer ... done
once your container's are running, we can do the nginx setup.
Step 2: Configuring nginx reverse proxy for our domain on host.
A reference nginx configuration for nextcloud AIO is given in the nextcloud git repository here . You can modify the configuration file according to your needs and setup.
Here is configuration that we are using
map $http_upgrade $connection_upgrade {
    default upgrade;
    '' close;
}

server {
    listen 80;
    #listen [::]:80;            # comment to disable IPv6

    if ($scheme = "http") {
        return 301 https://$host$request_uri;
    }

    listen 443 ssl http2;      # for nginx versions below v1.25.1
    #listen [::]:443 ssl http2; # for nginx versions below v1.25.1 - comment to disable IPv6

    # listen 443 ssl;      # for nginx v1.25.1+
    # listen [::]:443 ssl; # for nginx v1.25.1+ - keep comment to disable IPv6

    # http2 on;                                 # uncomment to enable HTTP/2        - supported on nginx v1.25.1+
    # http3 on;                                 # uncomment to enable HTTP/3 / QUIC - supported on nginx v1.25.0+
    # quic_retry on;                            # uncomment to enable HTTP/3 / QUIC - supported on nginx v1.25.0+
    # add_header Alt-Svc 'h3=":443"; ma=86400'; # uncomment to enable HTTP/3 / QUIC - supported on nginx v1.25.0+
    # listen 443 quic reuseport;       # uncomment to enable HTTP/3 / QUIC - supported on nginx v1.25.0+ - please remove "reuseport" if there is already another quic listener on port 443 with enabled reuseport
    # listen [::]:443 quic reuseport;  # uncomment to enable HTTP/3 / QUIC - supported on nginx v1.25.0+ - please remove "reuseport" if there is already another quic listener on port 443 with enabled reuseport - keep comment to disable IPv6

    server_name cloud.example.com;

    location / {
        proxy_pass http://127.0.0.1:32323$request_uri;

        proxy_set_header X-Forwarded-For $proxy_add_x_forwarded_for;
        proxy_set_header X-Forwarded-Port $server_port;
        proxy_set_header X-Forwarded-Scheme $scheme;
        proxy_set_header X-Forwarded-Proto $scheme;
        proxy_set_header X-Real-IP $remote_addr;
        proxy_set_header Accept-Encoding "";
        proxy_set_header Host $host;

        client_body_buffer_size 512k;
        proxy_read_timeout 86400s;
        client_max_body_size 0;

        # Websocket
        proxy_http_version 1.1;
        proxy_set_header Upgrade $http_upgrade;
        proxy_set_header Connection $connection_upgrade;
    }

    ssl_certificate /etc/letsencrypt/live/cloud.example.com/fullchain.pem; # managed by Certbot
    ssl_certificate_key /etc/letsencrypt/live/cloud.example.com/privkey.pem; # managed by Certbot

    ssl_session_timeout 1d;
    ssl_session_cache shared:MozSSL:10m; # about 40000 sessions
    ssl_session_tickets off;

    ssl_protocols TLSv1.2 TLSv1.3;
    ssl_ciphers ECDHE-ECDSA-AES128-GCM-SHA256:ECDHE-RSA-AES128-GCM-SHA256:ECDHE-ECDSA-AES256-GCM-SHA384:ECDHE-RSA-AES256-GCM-SHA384:ECDHE-ECDSA-CHACHA20-POLY1305:ECDHE-RSA-CHACHA20-POLY1305:DHE-RSA-AES128-GCM-SHA256:DHE-RSA-AES256-GCM-SHA384:DHE-RSA-CHACHA20-POLY1305;
    ssl_prefer_server_ciphers on;

    # Optional settings:

    # OCSP stapling
    # ssl_stapling on;
    # ssl_stapling_verify on;
    # ssl_trusted_certificate /etc/letsencrypt/live/<your-nc-domain>/chain.pem;

    # replace with the IP address of your resolver
    # resolver 127.0.0.1; # needed for oscp stapling: e.g. use 94.140.15.15 for adguard / 1.1.1.1 for cloudflared or 8.8.8.8 for google - you can use the same nameserver as listed in your /etc/resolv.conf file
}
Please note that you need to have valid SSL certificates for your domain for this configuration to work. Steps on getting valid SSL certificates for your domain are beyond the scope of this article. You can give a web search on getting SSL certificates with letsencrypt and you will get several resources on that, or may write a blog post on it separately in the future.
once your configuration for nginx is done, you can test the nginx configuration using
$ sudo nginx -t
nginx: the configuration file /etc/nginx/nginx.conf syntax is ok
nginx: configuration file /etc/nginx/nginx.conf test is successful
and then reload nginx with
$ sudo nginx -s reloadStep 3: Setup of Nextcloud AIO from the browser.
To setup nextcloud AIO, we need to access it using the web browser on URL of our domain.tld:8080, however we do not want to open the 8080 port publicly to do this, so to complete the setup, here is a neat hack from sahilister
ssh -L 8080:127.0.0.1:8080 username@<server-ip>you can bind the 8080 port of your server to the 8080 of your localhost using Unix socket forwarding over SSH.
The port forwarding only last for the duration of your SSH session, if the SSH session breaks, your port forwarding will to.
So, once you have the port forwarded, you can open the nextcloud AIO instance in your web browser at 127.0.0.1:8080
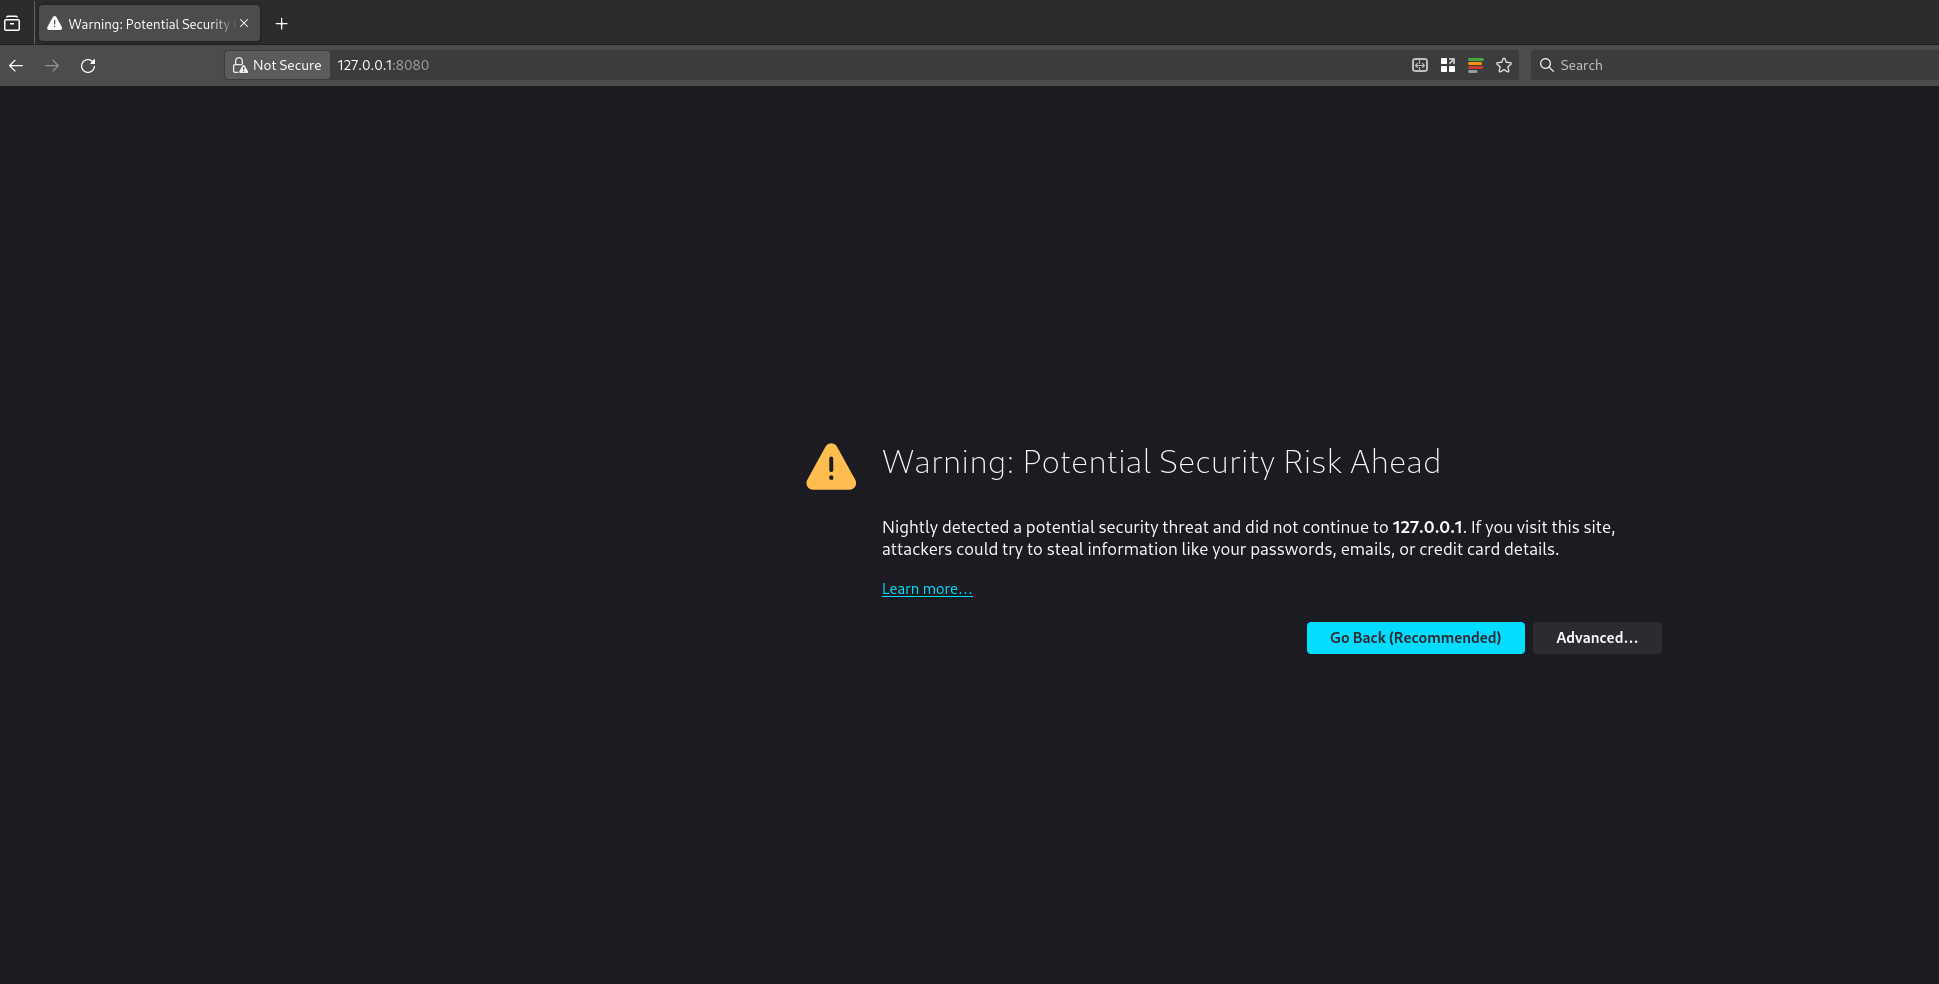
you will get this error because you are trying to access a page on localhost over HTTPS. You can click on advanced and then continue to proceed to the next page. Your data is encrypted over SSH for this session as we are binding the port over SSH.
Depending on your choice of browser, the above page might look different.
once you have proceeded, the nextcloud AIO interface will open and will look something like this.
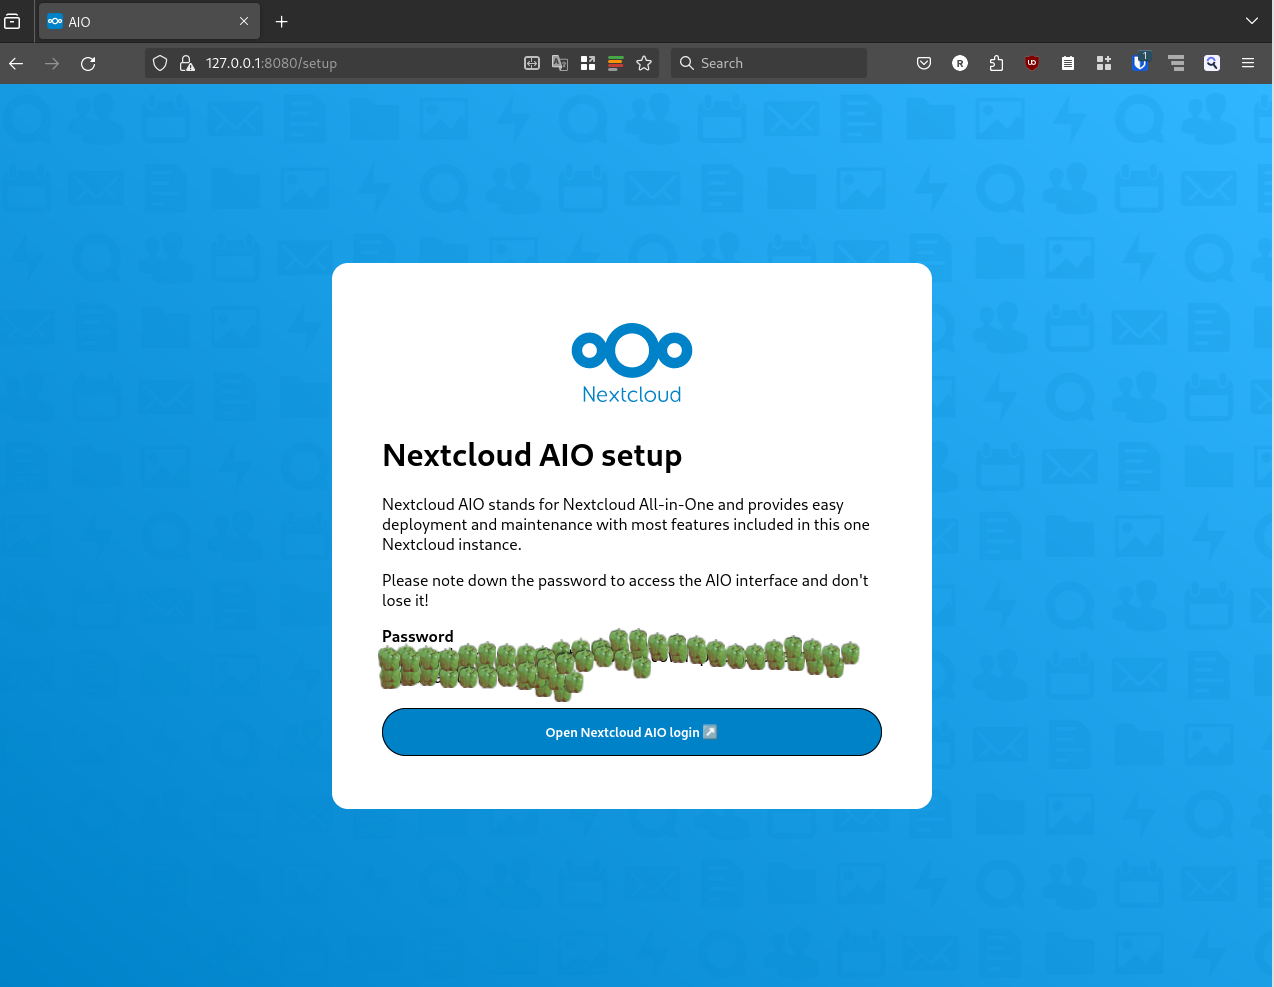
It will show an auto generated passphrase, you need to save this passphrase and make sure to not loose it. For the purposes of security, I have masked the passwords with capsicums.
once you have noted down your password, you can proceed to the Nextcloud AIO login, enter your password and then login.
If for some reasons you lose the initial password screen and did not note your password. You can get the initial password by running this on the server
sudo docker exec nextcloud-aio-mastercontainer grep password /mnt/docker-aio-config/data/configuration.jsonso now once you have the password, you can click on the open nextcloud AIO login button and enter using the password.
After login you will be greeted with a screen like this.
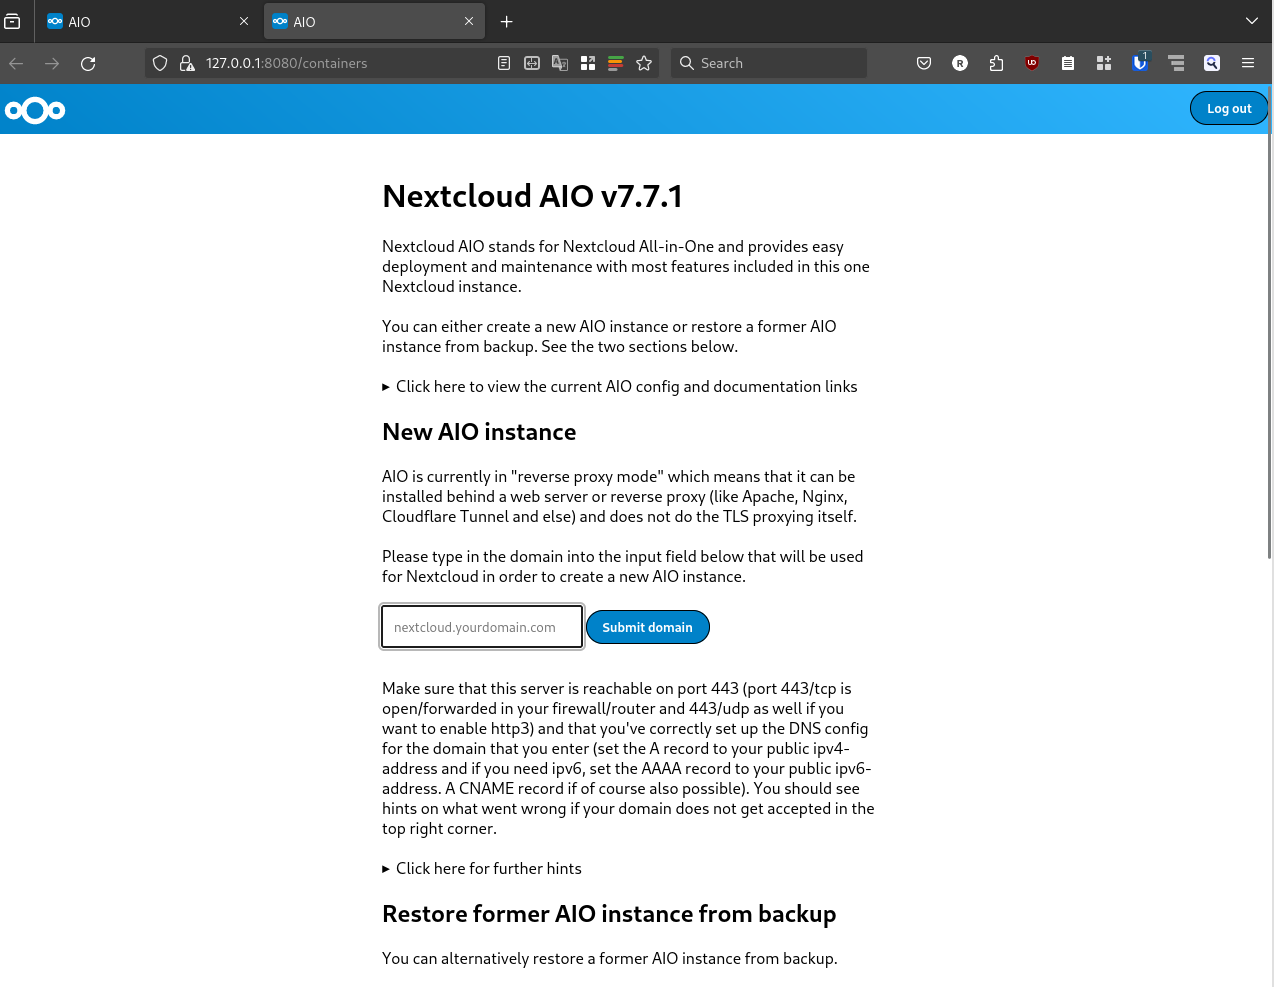
now you can put the domain that you want to use in the Submit domain field. Once the domain check is done, you will proceed to the next step and see another screen like this
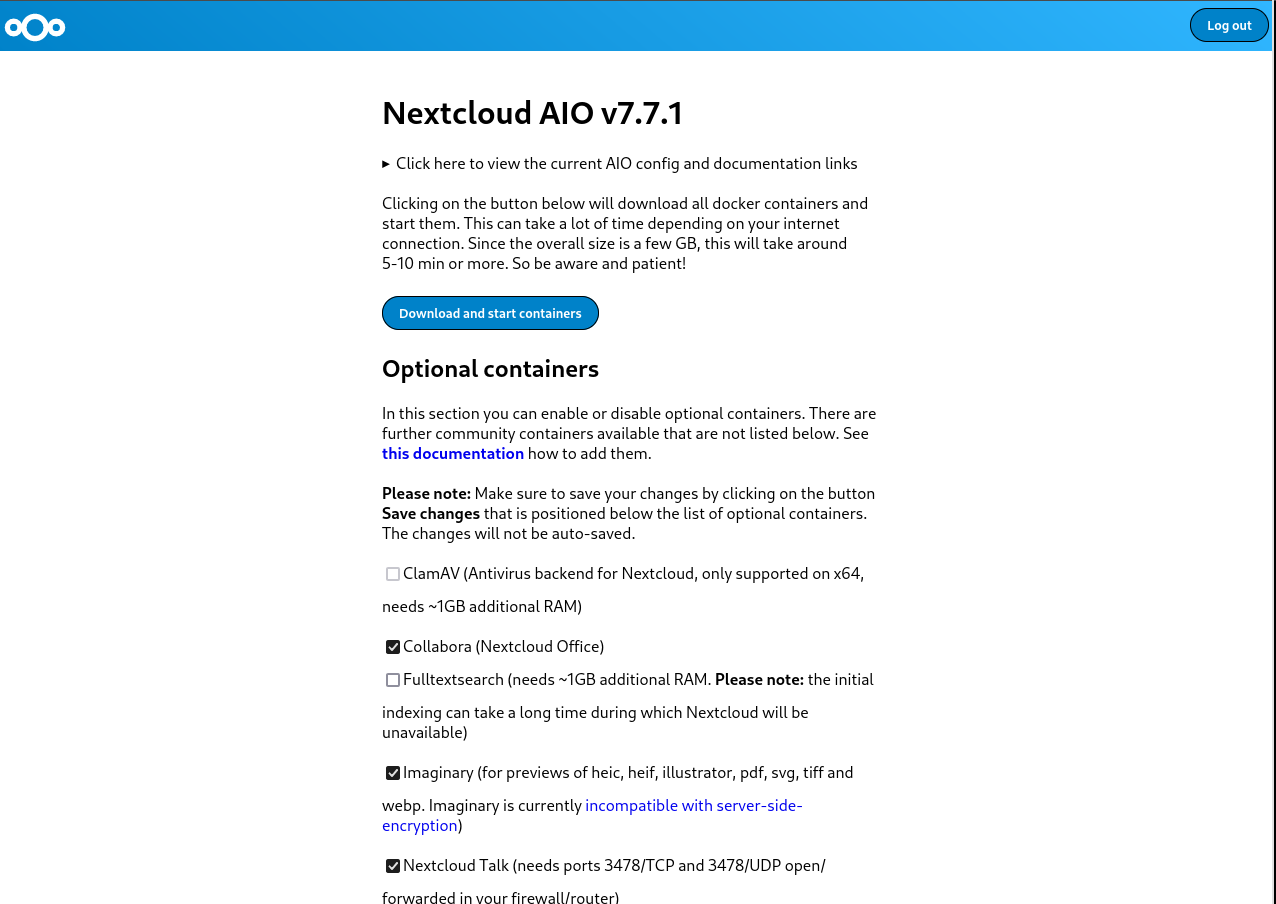
here you can select any optional containers for the features that you might want.
IMPORTANT: Please make sure to also change the time zone at the bottom of the page according to the time zone you wish to operate in.
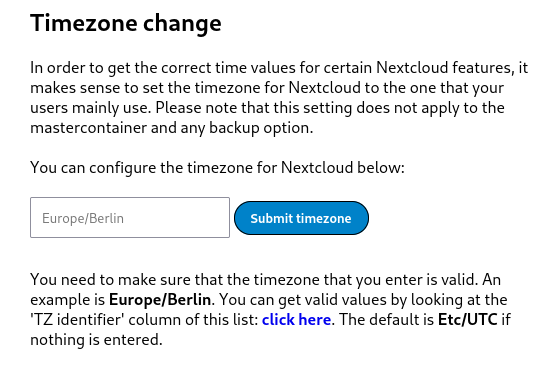
The timezone setup is also important because the data base will get initialized according to the set time zone. This could result in wrong initialization of database and you ending up in a startup loop for nextcloud. I faced this issue and could only resolve it after getting help from sahilister .
Once you are done changing the timezone, and selecting any additional features you want, you can click on Download and start the containers
It will take some time for this process to finish, take a break and look at the farthest object in your room and take a sip of water. Once you are done, and the process has finished you will see a page similar to the following one.
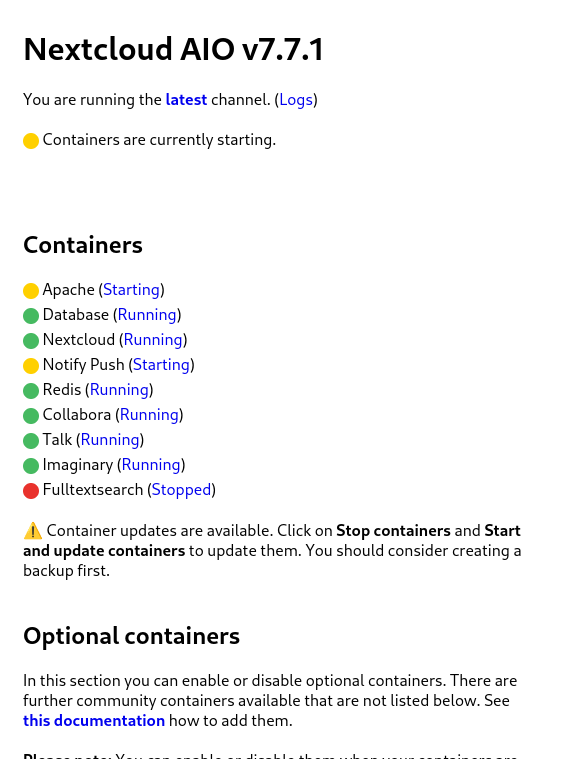
wait patiently for everything to turn green.
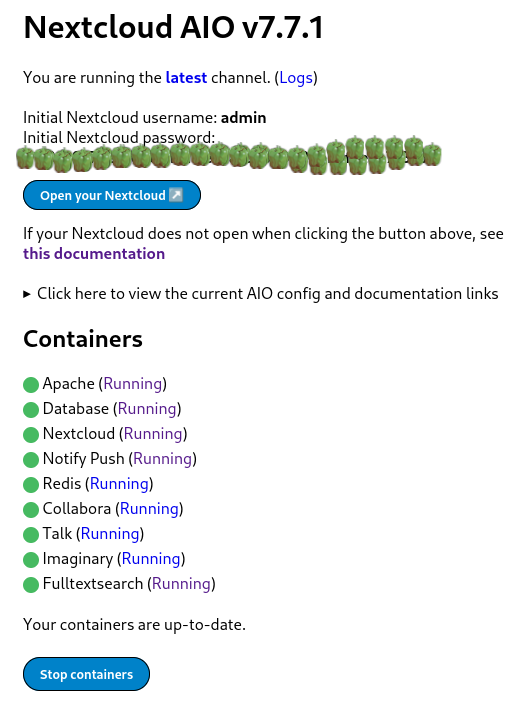
once all the containers have started properly, you can open the nextcloud login interface on your configured domain, the initial login details are auto generated as you can see from the above screenshot. Again you will see a password that you need to note down or save to enter the nextcloud interface. Capsicums will not work as passwords. I have masked the auto generated passwords using capsicums.
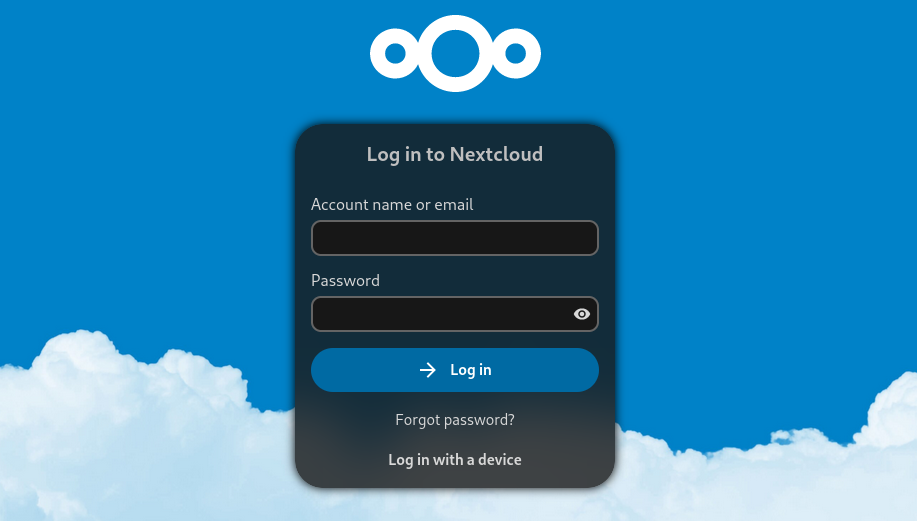
Now you can click on Open your Nextcloud button or go to your configured domain to access the login screen.
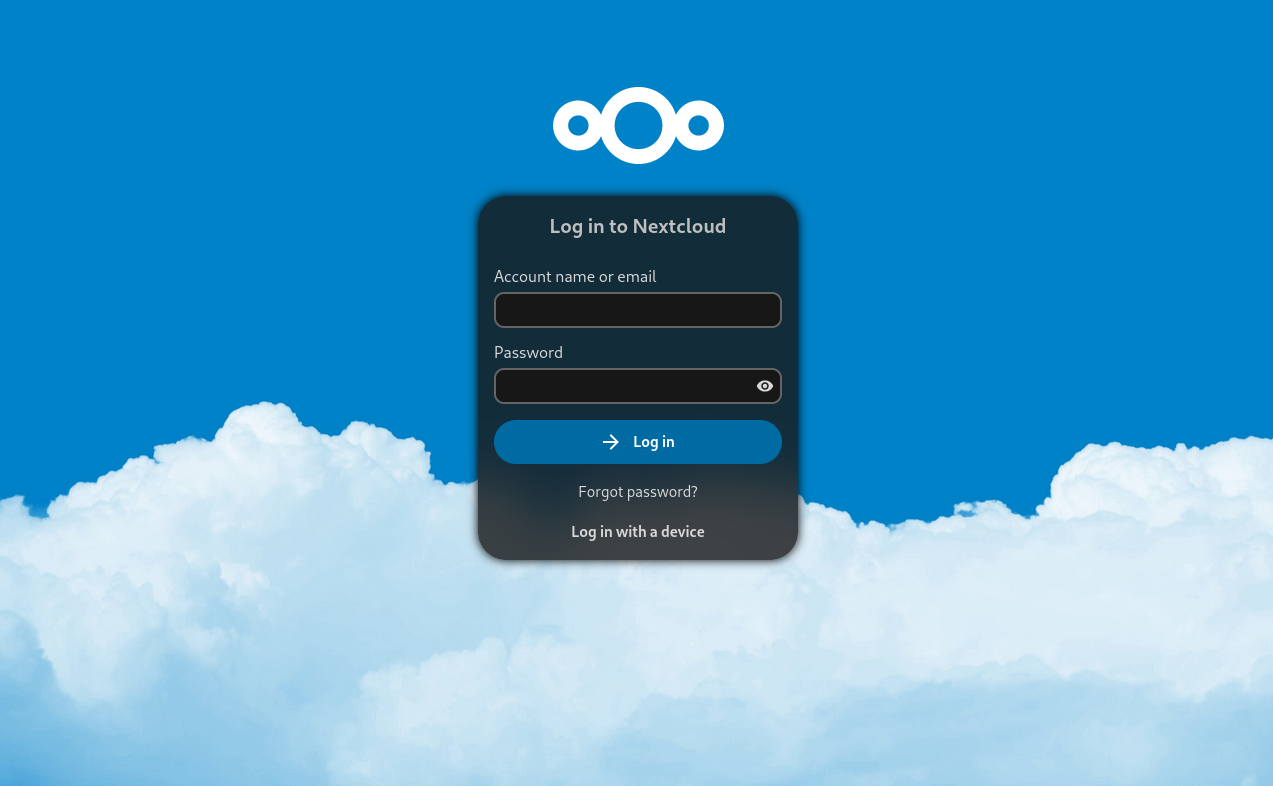
You can use the login details from the previous step to login to the administrator account of your Nextcloud instance.
There you have it, your very own cloud!
Additional Notes:
How to properly reset Nextcloud setup?
While following the above steps, or while following steps from some other tutorial, you may have made a mistake, and want to start everything again from scratch. The instructions for it are present in the Nextcloud documentation here . Here is the TLDR for a docker-compose setup. These steps will delete all data, do not use these steps on an existing nextcloud setup unless you know what you are doing.
- Stop your master container.
docker-compose -f compose.yml down -vThe above command will also remove the volume associated with the master container
- Stop all the child containers that has been started by the master container.
docker stop nextcloud-aio-apache nextcloud-aio-notify-push nextcloud-aio-nextcloud nextcloud-aio-imaginary nextcloud-aio-fulltextsearch nextcloud-aio-redis nextcloud-aio-database nextcloud-aio-talk nextcloud-aio-collabora- Remove all the child containers that has been started by the master container
docker rm nextcloud-aio-apache nextcloud-aio-notify-push nextcloud-aio-nextcloud nextcloud-aio-imaginary nextcloud-aio-fulltextsearch nextcloud-aio-redis nextcloud-aio-database nextcloud-aio-talk nextcloud-aio-collabora- If you also wish to remove all images associated with nextcloud you can do it with
docker rmi $(docker images --filter "reference=nextcloud/*" -q)- remove all volumes associated with child containers
docker volume rm <volume-name>- remove the network associated with nextcloud
docker network rm nextcloud-aio